Take a look at the bottom of this post. Hover your mouse over the Social Bookmarks displayed there. Do you like this hack? I thought so.
I saw this use of dynamic HTML at one of my favorite websites, Vladstudio. And reverse-engineered it to fit into Blogger Beta.
For starters, I just give you some simple instructions on how to implement this hack. Later on I'll expand on how this hack works and how to tailor it to your needs. If you want to have other services, let me know.
Implementation is easy.
Step 0: Backup your template.
Step 1: Add the following code to the head of your template:
<script src='http://home.planet.nl/~hansoosting/downloads/beautifulbeta.js' type='text/javascript'/>
Step 2: Find the following line of code in your template:
<p class='post-footer-line post-footer-line-3'/>
and replace it with the code from this file (right-click and save).
Save your template and there you go!
And now for some tech stuff.
At the bottom of the post I have added a 1-row, 2-column table. The left cell contains the text, the right cell displays the icons. The text is between divs with a unique id. The id consists of the string "sbtxt" followed by the post id (data:post.id). Each icon is a link to the specified social bookmark services, and can trigger a onmouseover-event and a onmousout-event. The onmouseover event trigger a call to a javascript showsbtext-function, passing the unique id of the left text-cell, and passing a number from 1 to N, N being the total number of icons. The javascript functions looks for the specified div, and replaces its inner text with another text, such as Add to Digg. The onmouseout-event again invokes this javascript, but now by passing a value of 0 it lets the function display the standard-text.
How to tailor it to your own needs.
You can replace the icons with icons of your own choice. You have to change the links between the <img/>-tags to accomodate for that. You could also change the text that is displayed, by downloading the js-file, and changing the string-array to the values you like.
But I am sure that with this way-points layed out for you, most of you will be able to work it out.
If you need help, please let me know!
Thursday, September 28, 2006
Enhanced Blog Interactivity Using Polls
Completely new to me, and extremely easy to implement are free polls from Pollhost. You can have a poll up and running on your blog withing a few minutes. Just open an account, create your first poll, generate the HTML, and paste it into a Blogger Beta html-page element.
You can have up to 15 polls running, and each poll can have up to 20 answers.
So, let me know which hack is most usefull to you. And if you like other polls, please let me know!
You can have up to 15 polls running, and each poll can have up to 20 answers.
So, let me know which hack is most usefull to you. And if you like other polls, please let me know!
Sunday, September 24, 2006
Improved Super Peek-A-Boo Post
Did you like the Super-Peek-A-Boo post? Then I am sure you will like this improvement as well! After collapsing a post, it auto-scrolls back to the top of the post. That's nice, isn't it? You can see it at work now if you expand and collapse the post you are reading now.
One of the comments I received on the Super Peek-A-Boo post is, that after collapsing a post you end up reading another post, that 'moves up' into view because you collapse the post.
So I sleft a few nights on it, and came up with a very simple solution to this (cosmetic) problem. You need to make 2 slight adjustments.
One is to the 'post'-includable. If you followed my instructions on peek-a-boo posts, you gave the post-body <div> an id. You have to move this id to the top of the includable like this:
<b:includable id='post' var='post'>
<div class='post uncustomized-post-template' expr:id='"post-" + data:post.id' >
We will use this id to scroll back to, so by placing it at the top we assure that we scroll back to the top of the post (and not to the top of the body, which would leave out the post title).
Secondly, we need to adapt the javascript hideFull() function, by adding a tiny line of code at the end:
post.scrollIntoView(true);
Thats all to make it work!
In order to adhere to common standards I asked Ramani to update his Hackosphere.js-file to include the new line of code. So be patient until Ramani releases the new file.
New 3-column, fluid, peek-a-boo template
Thursday, September 21, 2006
Non-Beta Super Peek-A-Boo Posts (improved)
For all you Non-Beta users: we now present our Improved Super Peek-A-Boo Post for Non-Beta. It has autoscrollback, so that after collapsing the post it scrolls back to the top of the post.
You can see it in action at Xenofon.
Step 0:
Backup your template.
Step 1:
Add Ramani's Javascript-code to the head of your template, just below the <head>:
<script type="text/javascript" src="http://www.anniyalogam.com/widgets/hackosphere.js"></script>
Step 2:
Look up the post class in your template, and add the red code:
<!-- Begin .post -->
<div class="post" id="<$BlogItemNumber$>1" ><a name="<$BlogItemNumber$>"></a>
<BlogItemTitle>
<h3 class="post-title">
<BlogItemUrl><a href="<$BlogItemUrl$>" title="external link"></BlogItemUrl>
<$BlogItemTitle$>
<BlogItemUrl></a></BlogItemUrl>
</h3>
</BlogItemTitle>
<div class="post-body">>
<div>
<MainOrArchivePage>
<style>#fullpost {display: none}</style>
</MainOrArchivePage>
<$BlogItemBody$>
<MainOrArchivePage>
<span id="showlink"><a href="javascript:showFull('<$BlogItemNumber$>1')">Read More...</a></span>
<span id="hidelink" style="display: none"><a href="javascript:hideFull('<$BlogItemNumber$>1')">Collapse...</a></span>
<script type="text/javascript">checkFull('<$BlogItemNumber$>1');</script>
</MainOrArchivePage>
</div>
</div>
Now save your template.
Step 3:
In your settings, add the following lines to the post template:
Type summary here
<span id="fullpost">
Type rest of post here
</span>
Wednesday, September 20, 2006
Super Peek-A-Boo Posts
Ramani and I proudly present our Super Peek-A-Boo posts: you can expand them from summary to full post, collapse them, and if you don't have a post summary in a particular post, the "Read More..." and "Collapse" links will not show up in your post.
As you can see in this post, it starts with only the summary, followed by the 'Read more...' link. Clicking the link expands to the full post. Now at the bottom you will find a 'Summary only...' link, that collapses the post back to its summary.
This hack was first implemented by Ramani at Hackosphere. I expanded on it to make it collapsable. Together we developed the finishing touch of hiding the expand/collapse link when there is no need for them.
This is how to implement it.
Step 0:
Back-up your template before modifying it.
Step 1:
Add the following javascript code to the head of your template. You can place it just above the </head>-tag.
<script type='text/javascript' src='http://www.anniyalogam.com/widgets/hackosphere.js' />
Step 2:
Find the includable named 'post' in your template, and change it so that it is exactly as shown below (the code in red has to be added):
<b:includable id='post' var='post'>
<div class='post'>
<a expr:name='data:post.id'/>
<b:if cond='data:post.title'>
<h3 class='post-title'>
<b:if cond='data:post.url'>
<a expr:href='data:post.url'><data:post.title/></a>
<b:else/>
<data:post.title/>
</b:if>
</h3>
</b:if>
<div class='post-header-line-1'/>
<div class='post-body' expr:id='"post-" + data:post.id'>
<b:if cond='data:blog.pageType == "item"'>
<p><data:post.body/></p>
<b:else/>
<style>#fullpost {display:none;}</style>
<p><data:post.body/></p>
<span id='showlink'>
<p><a expr:onclick='"javascript:showFull(\"post-" + data:post.id + "\");"' href='javascript:void(0);'>Read More...</a></p>
</span>
<span id='hidelink' style='display:none'>
<p><a expr:onclick='"javascript:hideFull(\"post-" + data:post.id + "\");"' href='javascript:void(0);'>Summary only...</a></p>
</span>
<script type='text/javascript'>checkFull("post-" + "<data:post.id/>")</script>
</b:if><div style='clear: both;'/> <!-- clear for photos floats -->
</div>
</div>
.... rest of template code ....
Save your template.
Step 3:
In the Settings - Formatting tab go to the bottom and enter the following post-template:
Type your summary here.
<span id="fullpost">
Type the rest of your post here.
</span>
Now every new post you start will have a fullpost-span by default. If your post is short, you can delete the <span>-tags from the post. The post will be displayed in full, and no links with "Read more..." or "Summary only" will be displayed for that post.
How it works (skip this if you don't like tech stuff).
The changes you made to the code make that every post-body consists of at least 3 span's: the fullpost-span that you entered in the post-template, a span for the 'Read more'-link, and a span for the 'Summary only'-link. Because there might be other spans in your post, each of these 3 spans have a unique id ('fullpost', 'showlink' and 'hidelink' respectively).
When you open your blog on the main page, the post is displayed as follows:
The post is given a unique id, and this id is passed to the javascript-functions showFull and hideFull respectively. These functions use the getElementsByTagName-methods to obtain handles to the spans, and then toggle the way they are displayed.
A third function, checkFull, checks if the Fullpost-span exists. If not, both links are hidden.
As you can see in this post, it starts with only the summary, followed by the 'Read more...' link. Clicking the link expands to the full post. Now at the bottom you will find a 'Summary only...' link, that collapses the post back to its summary.
This hack was first implemented by Ramani at Hackosphere. I expanded on it to make it collapsable. Together we developed the finishing touch of hiding the expand/collapse link when there is no need for them.
This is how to implement it.
Step 0:
Back-up your template before modifying it.
Step 1:
Add the following javascript code to the head of your template. You can place it just above the </head>-tag.
<script type='text/javascript' src='http://www.anniyalogam.com/widgets/hackosphere.js' />
Step 2:
Find the includable named 'post' in your template, and change it so that it is exactly as shown below (the code in red has to be added):
<b:includable id='post' var='post'>
<div class='post'>
<a expr:name='data:post.id'/>
<b:if cond='data:post.title'>
<h3 class='post-title'>
<b:if cond='data:post.url'>
<a expr:href='data:post.url'><data:post.title/></a>
<b:else/>
<data:post.title/>
</b:if>
</h3>
</b:if>
<div class='post-header-line-1'/>
<div class='post-body' expr:id='"post-" + data:post.id'>
<b:if cond='data:blog.pageType == "item"'>
<p><data:post.body/></p>
<b:else/>
<style>#fullpost {display:none;}</style>
<p><data:post.body/></p>
<span id='showlink'>
<p><a expr:onclick='"javascript:showFull(\"post-" + data:post.id + "\");"' href='javascript:void(0);'>Read More...</a></p>
</span>
<span id='hidelink' style='display:none'>
<p><a expr:onclick='"javascript:hideFull(\"post-" + data:post.id + "\");"' href='javascript:void(0);'>Summary only...</a></p>
</span>
<script type='text/javascript'>checkFull("post-" + "<data:post.id/>")</script>
</b:if><div style='clear: both;'/> <!-- clear for photos floats -->
</div>
</div>
.... rest of template code ....
Save your template.
Step 3:
In the Settings - Formatting tab go to the bottom and enter the following post-template:
Type your summary here.
<span id="fullpost">
Type the rest of your post here.
</span>
Now every new post you start will have a fullpost-span by default. If your post is short, you can delete the <span>-tags from the post. The post will be displayed in full, and no links with "Read more..." or "Summary only" will be displayed for that post.
How it works (skip this if you don't like tech stuff).
The changes you made to the code make that every post-body consists of at least 3 span's: the fullpost-span that you entered in the post-template, a span for the 'Read more'-link, and a span for the 'Summary only'-link. Because there might be other spans in your post, each of these 3 spans have a unique id ('fullpost', 'showlink' and 'hidelink' respectively).
When you open your blog on the main page, the post is displayed as follows:
- Summary is displayed (always)
- Full text is hidden (first div, set to display:none)
- Read more is shown (second div)
- Summary only is hidden (third div, set to display:none)
The post is given a unique id, and this id is passed to the javascript-functions showFull and hideFull respectively. These functions use the getElementsByTagName-methods to obtain handles to the spans, and then toggle the way they are displayed.
A third function, checkFull, checks if the Fullpost-span exists. If not, both links are hidden.
This post has no summary
This is a post without a summary. As you can see, there is no "Read more..." link at the bottom, as it is hidden with the new Super-Peek-a-Boo functionality.
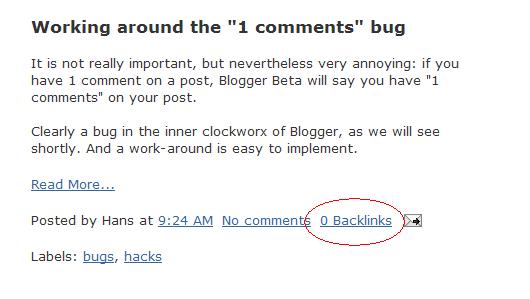
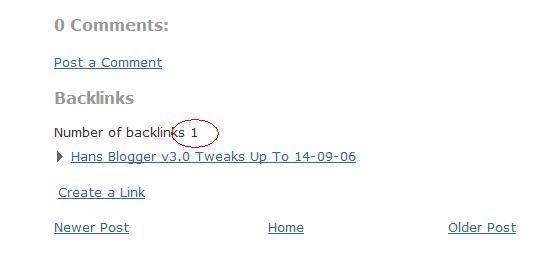
Backlinks bug ?
The number of backlinks on my posts are behaving strangely. A new bug to be solved?
Scroll down to my post called "Working around the 1 comments-bug". In the footer you will see "0 backlinks".
Scroll down to my post called "Working around the 1 comments-bug". In the footer you will see "0 backlinks".

Now open the post itself, and scroll to the bottom. You will see: Number of backlinks 1, followed by the link.

That is very strange, because for both counters the tag <data:post.numBacklinks/> is used. In the first case it gives 0, in the second case 1.
Any ideas out there what's happening here?
Any ideas out there what's happening here?
Monday, September 18, 2006
Sunday, September 17, 2006
Hacks and Bugs

In my last post I showed you my most recent hack to have expandable/collapsable peekaboo-posts, based on the work of Ramani.
I noticed that the Undefined Object Error that devastated my Blog last week, had returned. Luckily, I had saved my old template, and some uploading of templates proved what I suspected: implementing the hack leads to this horrible screendump.
Check it out for yourself, in 3 steps.
Step 1: download and backup your current template.
Step 2: get my template with peekaboo posts, and upload it to your blog.
Check for yourself how nice it works, and how shocking the screendump is when cliking older posts.
Step 3: get my template with normal posts, and upload it to your blog. The Older Posts link will work fine again.
I checked ou several Blogs, and found this bug on the following blogs:
- Hackosphere
- Hoctro (several pages down)
- Phydeaux3
Collapsable Posts
Ramani at Hackosphere published a great hack on expandable posts, that expand on the Blog main page. Building on this excellent work, I developed this hack to expand and collapse posts.
As you can see in this post, it starts with only the summary, followed by the 'Read more...' link. Clicking the link expands to the full post. Now at the bottom you will find a 'Summary only...' link, that collapses the post back to its summary.
If you want to know how this hack works, first check out the original hack at Hackosphere.
My hack works along exactly the same lines, with some code added.
Step 1:
Add the following javascript functions to the head of your template:
<script type='text/javascript'>
function showFullPost(id) {
post = document.getElementById(id);
var fullpost = post.getElementsByTagName('div');
if (fullpost.length != 0) {
fullpost[0].style.display = 'inline';
fullpost[1].style.display = 'none';
fullpost[2].style.display = 'inline';
}
}
function hideFullPost(id) {
post = document.getElementById(id);
var fullpost = post.getElementsByTagName('div');
if (fullpost.length != 0) {
fullpost[0].style.display = 'none';
fullpost[1].style.display = 'inline';
fullpost[2].style.display = 'none';
}
}
</script>
Step 2:
Find the includable named 'post' in your template, and change it so that it is exactly as shown below (the code in red has to be added):
<b:includable id='post' var='post'>
<div class='post'>
<a expr:name='data:post.id'/>
<b:if cond='data:post.title'>
<h3 class='post-title'>
<b:if cond='data:post.url'>
<a expr:href='data:post.url'><data:post.title/></a>
<b:else/>
<data:post.title/>
</b:if>
</h3>
</b:if>
<div class='post-header-line-1'/>
<div class='post-body' expr:id='"post-" + data:post.id'>
<b:if cond='data:blog.pageType == "item"'>
<p><data:post.body/></p>
<b:else/>
<style>#fullpost {display:none;}</style>
<p><data:post.body/></p>
<div>
<p><a expr:onclick='"javascript:showFullPost(\"post-" + data:post.id + "\");"' href='javascript:void(0);'>Read More...</a></p>
</div>
<div style='display:none'>
<p><a expr:onclick='"javascript:hideFullPost(\"post-" + data:post.id + "\");"' href='javascript:void(0);'>Summary only...</a></p>
</div>
</b:if><div style='clear: both;'/> <!-- clear for photos floats -->
</div>
</div>
.... rest of template code ....
Save your template.
Step 3:
In the Settings - Formatting tab go to the bottom and enter the following post-template:
Type your summary here.
<div id="fullpost">
Type the rest of your post here.
</div>
How it works (skip this if you don't like tech stuff).
The changes you made to the code make that every post-body consists of 3 div's: the fullpost-div that you entered in the post-template, a div for the 'Read more'-link, and a div for the 'Summary only'-link.
When you open your blog on the main page, the post is displayed as follows:
The post is given a unique id, and this id is passed to the javascript-functions showFullPost and hideFullPost respectively. These functions use the getElementsByTagName-methods to obtain handles to the 3 divs, and then toggle the way they are displayed.
Once I understood how Ramani had done the trick, it was easy to expand on his work.
Next steps.
It should also be possible to have posts without a summary. I'll try to get that done soon.
As you can see in this post, it starts with only the summary, followed by the 'Read more...' link. Clicking the link expands to the full post. Now at the bottom you will find a 'Summary only...' link, that collapses the post back to its summary.
If you want to know how this hack works, first check out the original hack at Hackosphere.
My hack works along exactly the same lines, with some code added.
Step 1:
Add the following javascript functions to the head of your template:
<script type='text/javascript'>
function showFullPost(id) {
post = document.getElementById(id);
var fullpost = post.getElementsByTagName('div');
if (fullpost.length != 0) {
fullpost[0].style.display = 'inline';
fullpost[1].style.display = 'none';
fullpost[2].style.display = 'inline';
}
}
function hideFullPost(id) {
post = document.getElementById(id);
var fullpost = post.getElementsByTagName('div');
if (fullpost.length != 0) {
fullpost[0].style.display = 'none';
fullpost[1].style.display = 'inline';
fullpost[2].style.display = 'none';
}
}
</script>
Step 2:
Find the includable named 'post' in your template, and change it so that it is exactly as shown below (the code in red has to be added):
<b:includable id='post' var='post'>
<div class='post'>
<a expr:name='data:post.id'/>
<b:if cond='data:post.title'>
<h3 class='post-title'>
<b:if cond='data:post.url'>
<a expr:href='data:post.url'><data:post.title/></a>
<b:else/>
<data:post.title/>
</b:if>
</h3>
</b:if>
<div class='post-header-line-1'/>
<div class='post-body' expr:id='"post-" + data:post.id'>
<b:if cond='data:blog.pageType == "item"'>
<p><data:post.body/></p>
<b:else/>
<style>#fullpost {display:none;}</style>
<p><data:post.body/></p>
<div>
<p><a expr:onclick='"javascript:showFullPost(\"post-" + data:post.id + "\");"' href='javascript:void(0);'>Read More...</a></p>
</div>
<div style='display:none'>
<p><a expr:onclick='"javascript:hideFullPost(\"post-" + data:post.id + "\");"' href='javascript:void(0);'>Summary only...</a></p>
</div>
</b:if><div style='clear: both;'/> <!-- clear for photos floats -->
</div>
</div>
.... rest of template code ....
Save your template.
Step 3:
In the Settings - Formatting tab go to the bottom and enter the following post-template:
Type your summary here.
<div id="fullpost">
Type the rest of your post here.
</div>
How it works (skip this if you don't like tech stuff).
The changes you made to the code make that every post-body consists of 3 div's: the fullpost-div that you entered in the post-template, a div for the 'Read more'-link, and a div for the 'Summary only'-link.
When you open your blog on the main page, the post is displayed as follows:
- Summary is displayed (always)
- Full text is hidden (first div, set to display:none)
- Read more is shown (second div)
- Summary only is hidden (third div, set to display:none)
The post is given a unique id, and this id is passed to the javascript-functions showFullPost and hideFullPost respectively. These functions use the getElementsByTagName-methods to obtain handles to the 3 divs, and then toggle the way they are displayed.
Once I understood how Ramani had done the trick, it was easy to expand on his work.
Next steps.
It should also be possible to have posts without a summary. I'll try to get that done soon.
Showing favorite Blogs in new window
An easy to implement hack to let links show up in a new window.
I found this simple hack at Vivek's blog a few days ago.
If you have a 'Links'-widget in your sidebar, clicking a link will show the linked-to webpage or blog in the same window, replacing your blog.
If you add target='_blank' in the widget (see below, in red) the linked-to webpage or blog will open in a new window.
<b:widget id='LinkList1' locked='false' title='Blogs of Note' type='LinkList'>
<b:includable id='main'>
<b:if cond='data:title'><h2><data:title/></h2></b:if>
<div class='widget-content'>
<ul>
<div id='link'>
<b:loop values='data:links' var='link'>
<li><a expr:href='data:link.target' target='_blank'><data:link.name/></a></li>
</b:loop>
</div>
</ul>
<b:include name='quickedit'/>
</div>
</b:includable>
</b:widget>
Saturday, September 16, 2006
RSS-feed online now
You can now get my RSS-feed from my sidebar.
Following Anniebluesky's example, I set up a Feedburner RSS-feed. I added a html-page element to my sidebar, called it 'Syndication' and added the FeedBurner code to it.
To make sure that visitors only use the FeedBurner-link, and not the 'Subscribe to Posts (Atom)' link at the bottom of my posts, I hid this part using css:
.feed-link { display: none }
As an alternative, you could remove the feedlink from your widget, but I prefer the css-solution, in order to stay as close to the Blogger standard widgets as possible.
Friday, September 15, 2006
Showing number of backlinks on footer
This hack shows the number of backlinks in your footer.
This hack is similar to the comments-hack I explained earlier.
Look for the backlinks-part of the posts, and add the red code.
<!-- backlinks -->
<span class='post-backlinks post-comment-link'>
<b:if cond='data:blog.pageType != "item"'>
<b:if cond='data:post.showBacklinks'>
<a class='comment-link' expr:href='data:post.url + "#links"' title='Check out who is linking to this post'>
<b:if cond='data:post.numBacklinks == 1'>1 Backlink
<b:else/>
<b:if cond='data:post.numBacklinks == 0'>
No <data:top.backlinkLabel/>
<b:else/>
<data:post.numBacklinks/> <data:top.backlinkLabel/>
</b:if></b:if>
</a>
</b:if>
</b:if>
</span>
Last Visit Message
Want to give your visitors a warm welcome and show them when they last visited your Blog? This is how it is done!
All experienced Blog-hackers will tell you that those Javascripts will terribly slow down the loading of your Blog.
I know that's true, but still, now and then I like one of those thingies on my Blog.
I added a Last Visit Message, that shows when you visited my blog for the last time.
It is very easy to implement.
First, add a new Page Element of the HTML-type to your Layout. Add the
following javascript code to the contents of this Page Element, and save.
Your message is ready!
If you want this message to appear only at your Blog's main page, you have to edit the widget in your template.
Look for the widget, and add the <b:if>-statements as shown in red:
<b:widget id='HTML1' locked='false' title='Last Visit' type='HTML'>
<b:includable id='main'>
<!-- only display if on homepage -->
<b:if cond='data:blog.url == data:blog.homepageUrl'>
<!-- only display title if it's non-empty -->
<b:if cond='data:title != ""'>
<h2 class='title'><data:title/></h2>
</b:if>
<div class='widget-content'>
<data:content/>
</div>
<b:include name='quickedit'/>
</b:if>
</b:includable>
</b:widget>
Wednesday, September 13, 2006
Adding a tooltip to your labels-links
Another polish-and-shine hack: add a tooltip to the labels-links. Hovering your mousepointer over the link in your posts footer will show a tooltip saying "More posts on this topic".
Insert the red code into your template.
<span class='post-labels'>
<b:if cond='data:post.labels'>
<data:postLabelsLabel/>
<b:loop values='data:post.labels' var='label'>
<a expr:href='data:label.url' title='More posts on this topic' rel='tag'><data:label.name/></a><b:if cond='data:label.isLast != "true"'>,</b:if>
</b:loop>
</b:if>
</span>
Easy!
More hacking into the comments line
On second thought: why not adapt the "0 comments" to something more interesting like "No comments at all" or "Please please please leave a comment" ?
It is easy as this. For explanation see my post on the 1 comment workaround.
<b:if cond='data:post.allowComments'>
<a class='comment-link' expr:href='data:post.addCommentUrl' expr:onclick='data:post.addCommentOnclick'>
<b:if cond='data:post.numComments == 1'>1 comment
<b:else/>
<b:if cond='data:post.numComments == 0'>No comments
<b:else/>
<data:post.numComments/> <data:top.commentLabelPlural/>
</b:if>
</b:if>
</a>
</b:if>
Adding a Message Board to your Blog
As you can see I added a Message Board to my Blog, that sticks to the top of the page. It is not a Post, but a Page Element that can be edited from the Layout Editor.
This is how I implemented the Message Board.
Add a new section to the template
At the top of the content-part, just beneath the content-wrapper div, add a new <div>, with a unique id (I chose 'message-board'). Inside this <div> add a new section, with a unique id and class. Set maxwidgets to 1, and showaddelements to 'yes'.
<div id='content-wrapper'>
<div id='message-board'>
<b:section class='msgbrd' id='msgbrd' maxwidgets='1' showaddelement='yes'/>
</div>
Add variables to the css-part of your template
To control the font and colors of the Message Board, add the following variables to your css:
<Variable name="MsgBrdFont" description="Message Board Font" type="font" default="italic normal 100% Verdana, Arial, Sans-serif;" value="italic normal 100% Verdana, Arial, Sans-serif;">
<Variable name="bgMsgBrd" description="Messageboard Background Color" type="color" default="#ffffff" value="#ffffcc">
<Variable name="borderMsgBrd" description="Messageboard Border Color"
type="color" default="#336699" value="#336699">
<Variable name="colMsgBrd" description="Messageboard Text Color"
type="color" default="#000000" value="#000000">
Add style-definitions for your Message Board classes
Now add the following css to the template.
/* Messageboard */
.msgbrd h2 {
display: none;
}
.msgbrd .widget-content {
padding: 2px 2% 2px;
background-color: $bgMsgBrd;
border: 4px solid $borderMsgBrd;
color: $colMsgBrd;
font: $MsgBrdFont;
}
Add the MessageBoard content
In the Add Page Elements-part of the Layout Editor you will see the new section just beneath your Header.
Click 'Add a Page Element' here, and select Text.
Enter a title and a message, and click Save.
Voila!
Changing the Color Scheme
The Fonts & Colors tab of the template editor lets you change the colors of your template in any which way you like. But did you know that you could manage all the colors and fonts of your template this way quite easily?
Variables
Blogger Beta uses variables to 'link' the Fonts & Colors editor to the css-part of your template. In this tutorial you will learn how to add variables to your template, and how to make it all work.
In the head of your template you will find 2 types of variables, one for fonts and one for colors.
Colors
The variable for colors looks like this:
<Variable name="bgColor" description="Background Color" type="color" default="#efefef" value="#efefef">
This means that you have a variable with the name bgColor. In the Fonts & Colors editor you will see the description (Background Color). The default value is some light-gray (#efefef), and its current value is also lightgrey.
Now, if you change the background color with the Layout editor, the new color value will be written in the value-field of the variable in the css-part of your template (try it!). Clicking on the template-defaults link in the Layout editor resets the color to the value stored in the default-field (isn't that a neat thing the Blogger guys came up with!)
Now, check all id's and classes where you want to use this background color. Remove all hard-coded colors, and replace them with a reference to the variable, in this case $bgColor. (Dollar-sign in front of the variable name).
So if your template's content-wrapper uses the background-color, change the code:
#content-wrapper {
background-color: #efefef; }
to:
#content-wrapper {
background-color: $bgColor; }
You can add as many variables as you like. Just use the format as given here, and replace all hard-coded colors with references to the variable name.
Variables will appear in your Layout editor in the same order as you entered them in the template. So choose the ordering well: group variables together logically.
You could end up with dozens of colors, but from a perspective of readibility of your blog that would not be a good idea. Think up a flexible color-scheme, but don't overdo it (unless it's Carnival next week....)
Fonts
Now, with fonts it works basically the same way as with color. The format of the variable is somewhat different.
<Variable name="bodyFont" description="Text Font" type="font" default="normal normal 100% Verdana, Arial, Sans-serif;" value="normal normal 100% Verdana, Arial, Sans-serif;">
Here, the default and value fields work the same as with colors. The entries normal and normal are used for indicating bold and italic. The setting for bold will be: "bold normal", for italic "normal italic", and for bold italic "bold italic".
You can add as many fonts-variables as you like. But again: don't overdo it!
Working around the "1 comments" bug
It is not really important, but nevertheless very annoying: if you have 1 comment on a post, Blogger Beta will say you have "1 comments" on your post.
Clearly a bug in the inner clockworx of Blogger, as we will see shortly. And a work-around is easy to implement.
How it works in Beta
Open your template, switch to HTML-editing mode, and look for the code below:
<b:if cond='data:post.allowComments'>
<a class='comment-link' expr:href='data:post.addCommentUrl' expr:onclick='data:post.addCommentOnclick'>
<b:if cond='data:post.numComments == 1'>1 <data:top.commentLabel/>
<b:else/>
<data:post.numComments/> <data:top.commentLabelPlural/>
</b:if>
</a>
</b:if>
Now what is the meaning of all this haberdash?
In plain language it says:
If your post allows comments, then do the following:
If the number of comments is exactly 1, print "1 comment", and if it is not exactly 1, print "X comments".
The number of comments is stored in the Blogger database in the <data:post.numComments/>-field. The text that has to be printed is stored in single ("comment") and in plural ("comments") in the fields <data:top.commentLabel/> and <data:top.commentLabelPlural/>-fields respectively.
This is done so that you can customize this text to any other text you like, such as "silly input" or to another language.
I think this is where Beta shows a bug: clearly both the single and the plural version of the "comment" text are the same.
So what you can do is this:
How to work around the bug.
Below you can see the code for the workaround. Replace the <data:top.commentLabel/> with "Comment".
<b:if cond='data:post.allowComments'>
<a class='comment-link' expr:href='data:post.addCommentUrl' expr:onclick='data:post.addCommentOnclick'>
<b:if cond='data:post.numComments == 1'>1 comment
<b:else/>
<data:post.numComments/> <data:top.commentLabelPlural/>
</b:if>
</a>
</b:if>
Clearly a bug in the inner clockworx of Blogger, as we will see shortly. And a work-around is easy to implement.
How it works in Beta
Open your template, switch to HTML-editing mode, and look for the code below:
<b:if cond='data:post.allowComments'>
<a class='comment-link' expr:href='data:post.addCommentUrl' expr:onclick='data:post.addCommentOnclick'>
<b:if cond='data:post.numComments == 1'>1 <data:top.commentLabel/>
<b:else/>
<data:post.numComments/> <data:top.commentLabelPlural/>
</b:if>
</a>
</b:if>
Now what is the meaning of all this haberdash?
In plain language it says:
If your post allows comments, then do the following:
If the number of comments is exactly 1, print "1 comment", and if it is not exactly 1, print "X comments".
The number of comments is stored in the Blogger database in the <data:post.numComments/>-field. The text that has to be printed is stored in single ("comment") and in plural ("comments") in the fields <data:top.commentLabel/> and <data:top.commentLabelPlural/>-fields respectively.
This is done so that you can customize this text to any other text you like, such as "silly input" or to another language.
I think this is where Beta shows a bug: clearly both the single and the plural version of the "comment" text are the same.
So what you can do is this:
- Wait for Blogger to solve this bug, or
- Implement my hack now!
How to work around the bug.
Below you can see the code for the workaround. Replace the <data:top.commentLabel/> with "Comment".
<b:if cond='data:post.allowComments'>
<a class='comment-link' expr:href='data:post.addCommentUrl' expr:onclick='data:post.addCommentOnclick'>
<b:if cond='data:post.numComments == 1'>1 comment
<b:else/>
<data:post.numComments/> <data:top.commentLabelPlural/>
</b:if>
</a>
</b:if>
Adding a second sidebar to your template
The Challenge
Now that we have learned about the section, it is fairly easy to add a second sidebar to your template. And what is even better: you can maintain this sidebar from the Blogger Beta Page Element layout screen!
How it works
The Blogger Beta template uses <div>-tags for several "wrappers".
The header is inside the Header-wrapper. The sidebar is inside the Sidebar-wrapper. The main section is inside the Main-wrapper, and the footer is inside the Footer-wrapper.
Main-wrapper and Sidebar-wrapper are inside the Content-wrapper.
And Header, Content, and Footer are surrounded by the Outer Wrapper.
The code looks like this:
<div id='outer-wrapper'>
<div id='header-wrapper'>
<b:section id='header' class='header' ....>
</div>
<div id='content-wrapper'>
<div id='main-wrapper'>
<b:section id='main' class='main' ....>
</div>
<div id='sidebar-wrapper'>
<b:section id='sidebar' class='sidebar' ....>
</div>
</div>
<div id='footer-wrapper'>
<b:section id='footer' class='footer' ....>
</div>
</div>
You will easily recognize this structure from your template.
You can add a left-sidebar in 3 easy steps:
Add a new wrapper for the left-sidebar to your template, inside the content-wrapper and in front of the main-wrapper.
Add a new section inside this wrapper, with a unique ID (for example leftsidebar) and set its class to 'sidebar'.
This is the code:
<div id='leftsidebar-wrapper'>
<b:section id='leftsidebar' class='sidebar' preferred='yes'/>
</div>
In the head of your template add css-code for a #leftsidebar-wrapper element, and set it to float left.
Adjust the width of your sidebars and your main-wrapper to fit the screen.
Editing your new sidebar
Now go to the layout-editor, and you will see the new sidebar to the left in your Page Elements Screen, and you can add new page elements to your new sidebar.
Page Layout in Blogger Beta
If we look into the html-code of the Beta template, we see a structure that is completely different from the structure we used to know from our old templates.
This post explains the new structure.
Sections and widgets
Blogger Beta uses sections and widgets to structure the content of your Blog. A section is a part of your Blog-page that contains elements that, logically, belong together. Blogger Beta has 4 sections to work with:
The Header section
Now let's look into the header section, as defined in our template:
<b:section class='header' id='header' maxwidgets='1' showaddelement='no'>
This tells us that the header-section can contain only 1 page element (widget) and that you can't add page elements to the header of the blogpage. If you open the Template-tab of Blogger Beta and click on Page Elements, you can see that it is not possible to add page elements to the header of your Blog.
Now let us tinker with our header:
<b:section class='header' id='header' maxwidgets='3' showaddelement='yes'>
This tells Blogger that you can have up to 3 elements in your header section. Switch to the Page Elements tab to see how this works.
The Sidebar section
We will now look into the sidebar section.
<b:section class='sidebar' id='sidebar' preferred='yes'>
In the default setting, we can add as many page elements to the sidebar as we like. Now let's try to set the maximum number of sidebar elements to 5.
<b:section class='sidebar' id='sidebar' maxwidgets='5' preferred='yes'>
The position of the sidebar, left or right, is not in the code of the section, but is chosen in the css-style of the sidebar. This way there is a strict seperation between the 'code' (Blogger code and html-tags) on the one side and the layout on the other side. (In fact, if you hack in the body-part of your template, changing the layout only affects the layout, not the hacking in the body!).
The Main section
The main section contains your blogs post. As you can see in the code below, there is no limit to the number of widgets in this section, but you will not see the 'Add a page element' box in this section in the layout editor. You can however drag/drop page elements from your sidebar to the main section.
<b:section class='main' id='main' showaddelement='no'>
If you want to disable this drag/drop possibility, set maxwidgets to 1:
<section class='main' id='main' maxwidgets='1' showaddelement='no'>
The Footer section
The footer section is at the bottom of the page. It can contain as many widgets as you like. Ofcourse you can customize this with the maxwidgets setting.
<b:section class='footer' id='footer'/>
This post explains the new structure.
Sections and widgets
Blogger Beta uses sections and widgets to structure the content of your Blog. A section is a part of your Blog-page that contains elements that, logically, belong together. Blogger Beta has 4 sections to work with:
- The header section, that contains your header (blogtitle and description)
- The main section, that contains your posts
- The sidebar section, that contains all your sidebar-stuff, such as profile, links, labels, blogroll, and gadgets
- The footer section, that contains all the things at the bottom of your blogpage
The Header section
Now let's look into the header section, as defined in our template:
<b:section class='header' id='header' maxwidgets='1' showaddelement='no'>
This tells us that the header-section can contain only 1 page element (widget) and that you can't add page elements to the header of the blogpage. If you open the Template-tab of Blogger Beta and click on Page Elements, you can see that it is not possible to add page elements to the header of your Blog.
Now let us tinker with our header:
<b:section class='header' id='header' maxwidgets='3' showaddelement='yes'>
This tells Blogger that you can have up to 3 elements in your header section. Switch to the Page Elements tab to see how this works.
The Sidebar section
We will now look into the sidebar section.
<b:section class='sidebar' id='sidebar' preferred='yes'>
In the default setting, we can add as many page elements to the sidebar as we like. Now let's try to set the maximum number of sidebar elements to 5.
<b:section class='sidebar' id='sidebar' maxwidgets='5' preferred='yes'>
The position of the sidebar, left or right, is not in the code of the section, but is chosen in the css-style of the sidebar. This way there is a strict seperation between the 'code' (Blogger code and html-tags) on the one side and the layout on the other side. (In fact, if you hack in the body-part of your template, changing the layout only affects the layout, not the hacking in the body!).
The Main section
The main section contains your blogs post. As you can see in the code below, there is no limit to the number of widgets in this section, but you will not see the 'Add a page element' box in this section in the layout editor. You can however drag/drop page elements from your sidebar to the main section.
<b:section class='main' id='main' showaddelement='no'>
If you want to disable this drag/drop possibility, set maxwidgets to 1:
<section class='main' id='main' maxwidgets='1' showaddelement='no'>
The Footer section
The footer section is at the bottom of the page. It can contain as many widgets as you like. Ofcourse you can customize this with the maxwidgets setting.
<b:section class='footer' id='footer'/>
Subscribe to:
Posts (Atom)