Thursday, November 30, 2006
Click-n-Go Widget Installer
Most of my visitors like high-value
blogging tools, but don't like to mess around with hacking, HTML, CSS
and all that tech stuff. Well, visitors, rejoice! Because now you can
install my Recent Posts widget and my Recent Comments widget without any
hacking. Click one of the buttons, enter your blog name and the
widget-settings, and add it to your blog. That's all folks! Spread the
word.
Sunday, November 26, 2006
A Simple Search Widget
Today I added a simple search box to my
Blog, that will search the content of my blog, and displays all the
posts that contain the search-expression. I got it from Phydeaux, and made a one-click installable widget out of it. Check it out, and install it from here.
Widget Installation and Downloads Page
On this page you can find all widgets and
downloads that I created for Beautiful Beta. You can use all widgets and
downloads free of charge, as long as you give credits on your site to
Beautiful Beta. All downloads and widgets have been tested for Internet
Explorer 6 and Firefox. If you notice any problems or bugs, please
report them as a comment.
Add the following code to your template's head, just above the </head>-tag:
Or download the file and host it from your own location. Right-click the link, and save the file to your computer.
The Picasa Albums Widget displays your public Picasa Albums in your sidebar.
This widget requires that your browser accepts script execution.
Learn how to install and customize this widget, or click the button and use the Click-n-Go Widget Installer to add this widget to your blog.
The coding of the widget was developed by Beautiful Beta.
This widget requires that your browser accepts script execution.
Learn how to install and customize this widget, or click the button to add this widget to your blog.
The coding of this widget was developed by Beautiful Beta and Hackospere.
Aorta Widget
The Aorta Widget displays a mashup from your Blogger Blog, your Picasa Web Albums, your Flickr Photo's and your YouTube Channel. Read the installation instructions!
This widget requires that your browser accepts script execution.
Click the button to add this widget to your blog.
The coding of this widget was developed by Beautiful Beta.
Javascript sourcefile
Most Beautiful Beta hacks and widgets make use of some javascript-functions. These functions are bundled in a javascript-library, that should be added to your template.Add the following code to your template's head, just above the </head>-tag:
<script src='http://home.kpn.nl/oosti468/downloads/beautifulbeta.js' type='text/javascript'/>
Or download the file and host it from your own location. Right-click the link, and save the file to your computer.
Picasa Albums Widget
The Picasa Albums Widget displays your public Picasa Albums in your sidebar.
This widget requires that your browser accepts script execution.
Learn how to install and customize this widget, or click the button and use the Click-n-Go Widget Installer to add this widget to your blog.
The coding of the widget was developed by Beautiful Beta.
Recent posts widget
The Recent Posts Widget displays recent posts summaries in your sidebar. You can customize this widget to display the recent posts of any blogger blog that you like, you can customize the number of posts to display, whether or not to display a postsummary and the size of this summary. And you can use a standard styling, or you can define your own CSS styling.
This widget requires that your browser accepts script execution.
Learn how to install and customize this widget, or click the button and use the Click-n-Go Widget Installer to add this widget to your blog.
The coding of the widget was developed by Beautiful Beta and Hackospere.
Recent comments widget
The Recent Comments Widget displays recent comments in your sidebar. You can customize this widget to display the recent comments of any blogger blog that you like, you can customize the number of comments to display, whether or not to display the author and the comment-date, and the size of the comment summary. You can define your own CSS styling to integrate it completely with the styling of your blog.This widget requires that your browser accepts script execution.
Learn how to install and customize this widget, or click the button to add this widget to your blog.
The coding of this widget was developed by Beautiful Beta and Hackospere.
Search widget
The Search widget allows you to search your blog. It requires no javascript or customization. Just click the button below to install it on your Blog.
The Search widget allows you to search your blog. It requires no javascript or customization. Just click the button below to install it on your Blog.
Recent Posts Widget for FTP Blogs
The Recent Posts Widget for FTP displays recent posts summaries in the sidebar of your FTP-blog. You can customize this widget in several ways. You can customize the number of posts to display, whether or not to display a postsummary and the size of this summary. And you can define your own CSS styling.
This widget requires that your browser accepts script execution.
Learn how to install and customize this widget, or click the button and use the Click-n-Go Widget Installer to add this widget to your blog.
Weather Report Widget
This is the first installable widget I created, it puts a weather report for Amsterdam on your blog.
This is the first installable widget I created, it puts a weather report for Amsterdam on your blog.
Google Calendar Widget
The Google Calendar Widget displays events from your Google Calendar in your sidebar. You can customize this widget to display the events of any public Google Calendar that you like; you can customize the number of events to display, whether or not to display the calendarname, calendardescription and owner, as well as whether or not to display event details. You can style the widget by adding some new classes tom your CSS styling.
This widget requires that your browser accepts script execution.
Learn how to install and customize this widget, or click the button to add this widget to your blog.
The coding of this widget was developed by Beautiful Beta.
Plaxo Pulse Widget
The Plaxo Pulse Widget displays events from your Plaxo Pulse in your sidebar. The widget needs JSON-formatted input, so you first have to Pipe your Plaxo Pulse Feed with Yahoo! Pipes. So first of all, read the installation instructions!
This widget requires that your browser accepts script execution.
Click the button to add this widget to your blog.
The coding of this widget was developed by Beautiful Beta.
Aorta Widget
The Aorta Widget displays a mashup from your Blogger Blog, your Picasa Web Albums, your Flickr Photo's and your YouTube Channel. Read the installation instructions!
This widget requires that your browser accepts script execution.
Click the button to add this widget to your blog.
The coding of this widget was developed by Beautiful Beta.
Saturday, November 25, 2006
Delving into JSON feeds
Developing my latest JSON-based widgets
was done with a lot of trial and error, without a good understanding of
the JSON-format and lacking knowledge of how to access the feed and
retrieve the data. So this weekend I did some research and developed a
small javascript program to analyze the feeds. It is tech stuff, so
don't worry if you don't understand it.
I found some documentation on the JSON-feed format, based on Google Calendar. A little later I discovered a simple tutorial on how to browse through JSON objects.
I changed this into a recursive javascript function, that browses the complete JSON-feed-tree, and displays all keys and all values. You can use is to research any JSON-feed.
Create a simple HTML-page, using the following code.
<html>
<head>
<script type='text/javascript'>
function listkeys(feedobj,depth) {
for (key in feedobj) {
for (var i=0; i<depth; i++) document.write('- ');
document.write(key+' = '+feedobj[key]+'<br/>');
listkeys(feedobj[key],depth+1);}
}
function showfeedcontent(json) {
listkeys(json,0);
}</script>
</head>
<body>
JSON FEED PARSER
<br/><br/>
<script src="http://beautifulbeta.blogspot.com/feeds/posts/default?alt=json-in-
script&callback=showfeedcontent"></script>
</body>
</html>
In this code replace the beautifulbeta.blogspot.com feed reference to your own blog's feed.
Open the HTML-page in your browser, and the complete feed will be displayed.
Customizable Recent Posts Widget
Now that we understand the JSON-feed
mechanism, it is quite easy to convert all our feeds to customizable
widgets, that you can copy to your own sidebar. You can use the widget
to display your own recent posts on your own blog, but you can in fact
display the post-feeds of any Blogger blog you like.
Installation is easy.
Install Widget
Go to the Widgets & Downloads Page and click the Install Recent Posts button.
This will bring up a pop-up window in which you can customize the widget settings, before adding it to your blog.
Replace 'beautifulbeta' with the name of your own blog.
Set the number of recent posts you want to show (default = 5).
If you want the post date to be displayed, check the box (default = checked).
If you want a post summary to be displayed, check the other box (default = checked), and enter the number of characters of the postsummary that you want to display (default = 100).
If you want the standard styling, select the 'standard' radio-button. If you want to define your own CSS-definitions, select 'custom css'. After installing the widget you will have to add CSS-definitions to your blog's template for the classes .bbrecpost, .bbrecpostsum and .bbwidgetfooter.
Now click the 'Customize' button, or click 'Reset' to return to the default values. If you are satisfied with the settings, click 'Add Widget To My Blog'. This will bring up the Blogger-screen that lets you select your Blog to install the widget to. Click the blue 'Add' button to add the widget to your blog.
Update 1: the widget did not work for Short feeds. That is fixed now, it will work for both Full and Short feeds.
Update 2: it is not longer needed to add the javascript library to your template. The widget now realy is plug and play.
Update 3: you can install the widget using Beautiful Beta's Widget Installer. Click-n-Go, no hacking or editing needed!
If your Blog is published to your own FTP-site, click here for the FTP-version of this widget.
Thursday, November 23, 2006
Customizable Recent Comments Widget
It is a Recent Comments Widget. You can
install it to your Blog with one mouseclick. You can customize it
without any template-hacking. It is completely flexible. And it is free!
It is based on the new JSON-feeds that are available from Blogger. That means you can have as many comments in your sidebar as you wish, you can have long or short summaries, and you can choose to add the date and the posttitle to the comment-summary as well. Now THAT's what we call flexibility.
I was inspired to create this widget by Ramani and Hoctro, who implemented a JSON-based Recent Comments widget. But I still missed date and posttitle options, things I recently hacked with in my own way. So I took up where Ramani stopped, and created this widget that you can see now in my sidebar.
How to Install the Widget
Go to the Widgets & Downloads Page and click the Install Recent Comments button.
This will bring up a pop-up window in which you can customize the widget settings, before adding it to your blog.
Replace 'beautifulbeta' with the name of your own blog.
Set the number of recent posts you want to show (default = 5).
If you want the post date to be displayed, check the box (default = checked).
If you want a post summary to be displayed, check the other box (default = checked), and enter the number of characters of the postsummary that you want to display (default = 100).
If you select standard styling, a predefined styling will be used. If you select custom css, you can define your own styling using the classes bbrecpost, bbrecpostsum and bbwidgetfooter.
Now click the 'Customize' button, or click 'Reset' to return to the default values. If you are satisfied with the settings, click 'Add Widget To My Blog'. This will bring up the Blogger-screen that lets you select your Blog to install the widget to. Click the blue 'Add' button to add the widget to your blog.
Wednesday, November 22, 2006
New Recent Comments Hack
Recent comments can be displayed in the
sidebar of your Blog using the Feed page element. As a Feed-url you can
provide "http://yourblogname/feeds/comments/full" to get the last 5
comments, with author and name. That's the standard functionality, and I
really didn't like it at all. The standard comments-feed has a few
things missing. First of all, the first few words of the comment are
displayed as a link, but clicking the link brings you to the top of the
post-item page in stead of to the comment itself. That is because of a
bug in the link that is provided by Blogger. Second, I want to see on
what post a person has commented. The feed doesn't provide for the post
title, but we could obtain it from the link - and that is where this
hack kicks in.
Our objective is to create a Recent Comments widget, that displays recent comments in the following format: "On [date & year] [author] commented on [post title]: [comment-summary] (more)".
Here is how you do it.
Step 1: Make a backup of your template.
Step 2: Add a standard recent comments widget to your Blog.
From the dashboard select your Blog and click Layout. Go to the Template tab and select Page Elements. In your sidebar add a Feed page element.
Enter your comment feed url.

Tick Item dates and Item sources on.
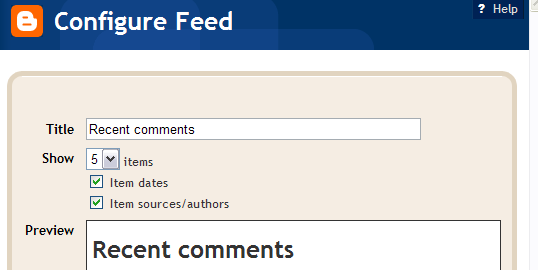
Save your template and view your Blog. You now have a standard recent comments widget.
Step 3: Add some javascript to the head of your template.
If you added my social bookmarking hack, you can skip this step.
If not, go to the Template tab, click Edit HTML, and add the following line of code to your templates head, just above the </head>-tag:
<script src='http://home.planet.nl/~hansoosting/downloads/beautifulbeta.js' type='text/javascript'/>
Save the template.
Step 4: Replace the widget coding
Go to the Template tab, and click Edit HTML. Now find your sidebar, and look for the new widget you just created. It will look something like this:
<b:widget id='Feed2' locked='false' title='Recent comments' type='Feed'/>
Now click Expand Widget Templates, and look for the widget. Use Ctrl-F to find it, using it's ID (in this example Feed2).
Replace the entire widget by the following code:
<b:widget id='Feed2' locked='false' title='Recent comments' type='Feed'>
<b:includable id='main'>
<h2><data:title/></h2>
<div class='widget-content'>
<ul expr:id='data:widget.instanceId + "_feedItemListDisplay"'>
<b:loop values='data:feedData.items' var='i'>
<li>
<b:if cond='data:showItemDate'>
<b:if cond='data:i.str_published != ""'>
<span class='item-date'>
On <data:i.str_published/>
</span>
</b:if>
</b:if>
<b:if cond='data:showItemAuthor'>
<b:if cond='data:i.author != ""'>
<span class='item-author'>
 - <data:i.author/> commented on
</span>
</b:if>
</b:if>
<script type='text/javascript'>getPostTitle("<data:i.alternate.href/>")</script> :
<span class='item-title'>
<data:i.title/> <script type='text/javascript'>getCommentLink("<data:i.alternate.href/>")</script>
</span>
</li>
</b:loop>
</ul>
<b:include name='quickedit'/>
</div>
</b:includable>
</b:widget>
Save your template.
Your hack is implemented now.
Tech stuff.
I started with the standard-widget. First I canged the order of the <data>-elements to date, author, comment-summary. The comment-summary is represented by <data:i.title/>. In the standard widget, the comment summary is embedded in an anchor that links (or should link) to the comment. The consruction looks like this:
<a expr:href='data:i.alternate.href'><data:i.title/></a>
The link-address of the <data:i.alternate.href/>-field has the following format: "http://yourblog.blogspot.com/year/month/posttitle.html#number".
We will use this link to parse the posttitle from it, and to retrieve the correct comment-permalink. The correct permalink to the comment has the folowing format:
"http://yourblog.blogspot.com/year/month/posttitle.html#comment-number".
I wrote 2 js functions. The first function, getPostTitle, is handed the alternate.href, and writes the post title as a hyperlink to the post-item-page to the document. The second function, getCommentLink, is handed the alternate.href, builds the correct permalink, and displays it as a (more)-link.
Thursday, November 16, 2006
Weather Report Widget
Widgetizing your Blog is the new thing to explore here on Beautiful Beta. Ramani shows how to add random Einstein quotes to your Blog. Phydeaux3 started all this showing Flickr Puppies, and even Hoctro
now shows a Flickr Zeitgeist widget. So it is time that Beautiful Beta
follows these fellows, with a useful Weather Forecast Widget. And
ofcourse a tutorial on how to create this widget on your own Blog and
make it easy-to-install for your readers.
You have to follow 3 easy steps:
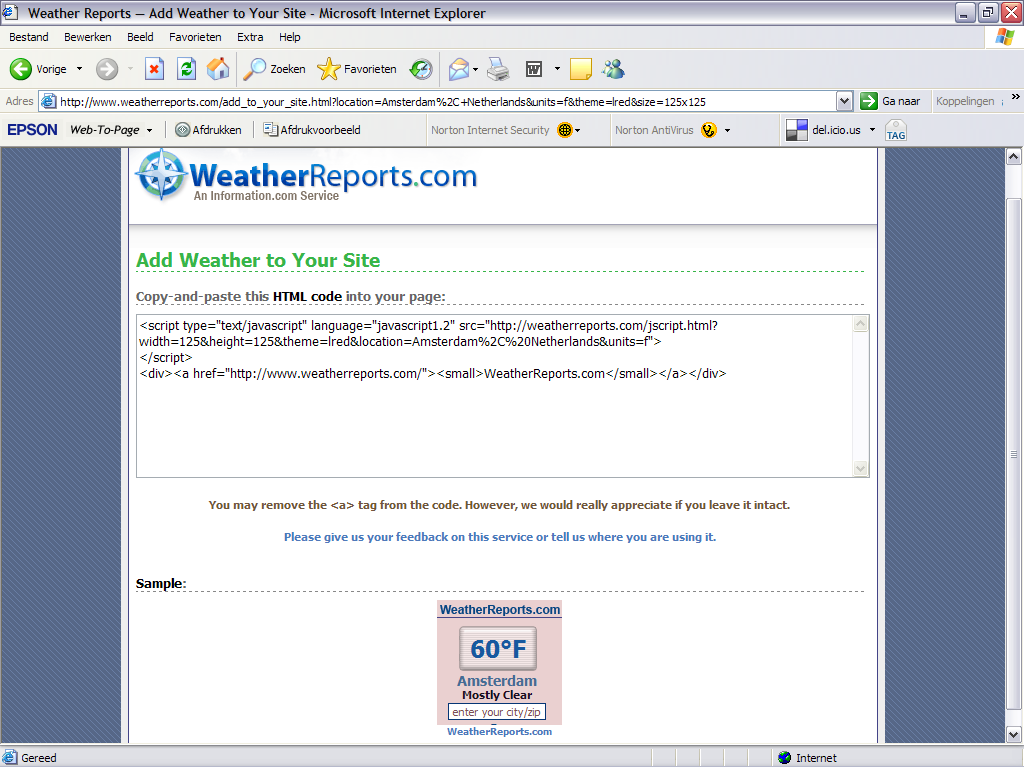
Go to WeatherReports.com, scroll down and click Add WeatherReports To Your Site.
In the next screen, enter your city, select the colors and style of the weatherbox. After entering all your selections, you will go to the next screen automatically. Take a look at the preview, and select and copy the HTML-code.
Step 2: Add the Widget to your Blog
Add an new HTML page element to the sidebar of your Blog. Paste the code that you copied into the page element, and set its title to "Weather Report".
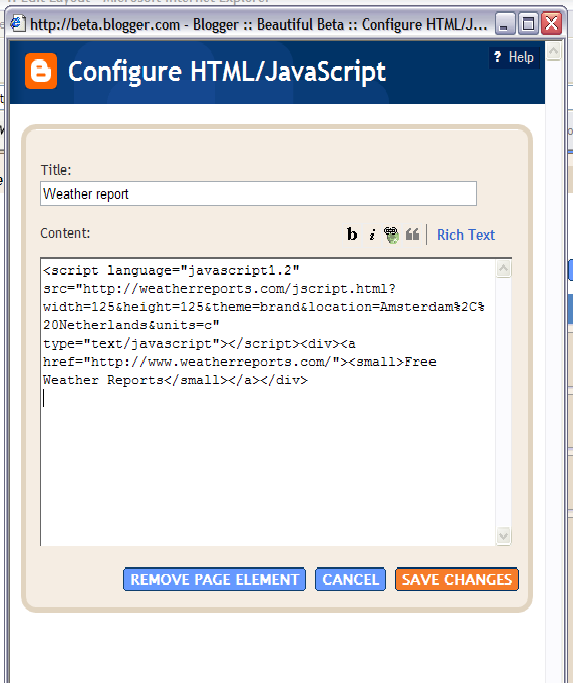
Don't save it yet, but go to step 3.
Step 3: Add an Install-button
Now we are going to add a button, that installs the widget on your visitors blog when it is clicked. In fact, we'll add a form with several input fields, but only the button will be visible. Here we go.
<form action="http://beta.blogger.com/add-widget" method="post">
<input value="Weather Report" name="widget.title" type="hidden"/>
<textarea style="display:none;" name="widget.content">
<script type="text/javascript" language="javascript1.2" src="http://weatherreports.com/jscript.html?width=125&height=125&theme=brand&location=Amsterdam%2C%20Netherlands&units=c"></script><div><a href="http://www.weatherreports.com/"><small>Free Weather Reports</small></a></div></textarea>
<input value="Install to Blog" name="go" type="submit"/>
</form>
The text between the <textarea>-tags is the html of your widget. Please notice that each < is replaced with <, and that each > is replaced with >.
Now save the page element and view your Blog.
For an example look here.
If you want more information on how to add third-party widgets to your blog, take a look at these help pages.
You have to follow 3 easy steps:
- Create the widget
- Add it to your Blog
- Add an Install-button to your Blog
Go to WeatherReports.com, scroll down and click Add WeatherReports To Your Site.
In the next screen, enter your city, select the colors and style of the weatherbox. After entering all your selections, you will go to the next screen automatically. Take a look at the preview, and select and copy the HTML-code.

Step 2: Add the Widget to your Blog
Add an new HTML page element to the sidebar of your Blog. Paste the code that you copied into the page element, and set its title to "Weather Report".

Don't save it yet, but go to step 3.
Step 3: Add an Install-button
Now we are going to add a button, that installs the widget on your visitors blog when it is clicked. In fact, we'll add a form with several input fields, but only the button will be visible. Here we go.
<form action="http://beta.blogger.com/add-widget" method="post">
<input value="Weather Report" name="widget.title" type="hidden"/>
<textarea style="display:none;" name="widget.content">
<script type="text/javascript" language="javascript1.2" src="http://weatherreports.com/jscript.html?width=125&height=125&theme=brand&location=Amsterdam%2C%20Netherlands&units=c"></script><div><a href="http://www.weatherreports.com/"><small>Free Weather Reports</small></a></div></textarea>
<input value="Install to Blog" name="go" type="submit"/>
</form>
The text between the <textarea>-tags is the html of your widget. Please notice that each < is replaced with <, and that each > is replaced with >.
Now save the page element and view your Blog.
For an example look here.
If you want more information on how to add third-party widgets to your blog, take a look at these help pages.
Monday, November 13, 2006
FTP publishing now works in Blogger Beta
Today I tried to create a Blog at my own
internet-provider, using the new Blogger FTP publishing facility. I was a
little afraid to do so, because of all the difficult questions I had to
answer, such as the host path, filenames, etcetera. But to my great
astonishment I set it up in less than 30 seconds!
So, that is good news if you want to publish a weblog at your own domain, or if you want to integrate weblog and classic webpages at one place on the web.
So, that is good news if you want to publish a weblog at your own domain, or if you want to integrate weblog and classic webpages at one place on the web.
Subscribe to:
Posts (Atom)