I finally switched to Windows Vista, and so far without any problems.
A thing I particularly like in Vista, is the Sidebar, and the Gadgets you can have there. It is very easy to create a gadget, it is just a tiny webpage, I read on many nerdpages, so I decided to give it a try.
And sure, it is very easy to build your own Vista Sidebar Widget.
In this post I will explain how I built a simple gadget that displays the 5 most recent post from the Beautiful Beta feed.
Now if you want to install the gadget, click this link.
Save
the file to your desktop, and check that its extension is .gadget. If
the file extension shows up as .zip, change it to .gadget. Doubleclick
the downloaded file to install the gadget. From your Vista Sidebar, add
the gadget.
If you want to see how it works, follow the next tutorial.
1. Check your local gadget folder
You
can find the installed gadget by pressing [windows] + R on your
keyboard, to bring up the 'Run'-dialog. In the inputbox enter
%userprofile\AppData\Local\Microsoft\Windows Sidebar\Gadgets
and click OK. This will bring you to your folder with local sidebar
gadgets (local means: only available to you, not to other users of your
PC).
Now you will see your new gadget, it's called BloggerFeed.gadget
2. Examine the gadget structure
Open the BloggerFeed.gadget folder. In it there are 2 files and 3 folders.
The
first file, BloggerFeed.html, is the gadget code, in html. Open it in
Windows Notepad and examine it. You can see some familiar code here,
calling the blogger JSON-feed for BeautifulBeta. If you like, change
"beautifulbeta" to the name of your own blog to view your own feed.
The
second file, gadget.xml, is called the Gadget Manifest, and contains
meta-data about the gadget. This data is displayed in the Gadget Window
when you try to add a new gadget to your sidebar.
The CSS-folder
contains the stylesheet for the gadget, defining fonttype, fontsize,
colrs, and so on. Not much different from your ordenary blog or website,
isn't it?
The JS-folder contains the javascript-code for retrieving
and parsing the JSON-feed. This code is also used in my Blogger Widget, a
hack you have most likely used yourself.
The IMAGES-folder contains the icon (I copied this one from a standard Microsoft gadget).
3. Try it and modify it!
It is as easy as this. Please try it yourself, change the looks, or the blog, or whatever you like, and share your experience!
4. Things to do
This is only a first simple approach. Things I like to add to it in the future:
- Fly-out to display feed contents
- Setup screen to change the blogname and other settings
- Auto-refresh
Enjoy!
Showing posts with label gadgets. Show all posts
Showing posts with label gadgets. Show all posts
Saturday, August 25, 2007

Saturday, April 7, 2007
Custom Search Engine
Visit Annie's Blog
to learn how you can add a custom search engine to your Blog. And check
out my sidebar for the Beautiful Beta Search Engine, that searches both
the Blog and the Wiki for your hottest hacks and templates!
Embed Powerpoint in Your Blog
And now for something completely different. How about embedding Powerpoint presentations into your Blog?Visit SlideAware, and create a free account. Download the Powerpoint Plug-In, and install it to Powerpoint.After creating your Powerpoint Presentation, you can save it to SlideAware. And it is very easy to embed it into your blog using:
<iframe src="http://personal.slideaware.com/yourmailadress/presentationid" width="480" height="380" style="border:none"></iframe>
<iframe src="http://personal.slideaware.com/yourmailadress/presentationid" width="480" height="380" style="border:none"></iframe>
Tuesday, October 24, 2006
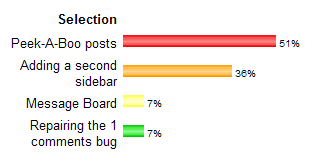
Poll Closed
Sunday, October 22, 2006
A simple Photo Album
If you like to have a simple photo album on your blog, here is an easy
to implement solution, without any javascript! It is just CSS, and a
bunch of html-links to the pictures you want to display. I found this
toy at Stu Nichols's CSSPlay, and wanted to share it with you.
Attention: if you add this to your Blog using the Blogger editor (as I did), Blogger adds <br/>-tags where it sees new lines. These <br/>-tags mess up the album when displayed with Firefox.
First, you have to add the following CSS to your style-sheet.
/* Photo album */
#album {
width:320px;
height:360px;
background:#eee url(deer.jpg) 0 40px no-repeat;
border:1px solid #aaa;
margin:0 auto;
text-align:center;
}
.gallery {
position: relative;
margin: 320px 0 0 0;
width: 320px;
padding: 0;
list-style-type: none;
}
.gallery img {
border: 0;
}
.gallery li {
float: left;
}
.gallery li a, .gallery li a:visited {
font-size:11px;
float:left;
text-decoration:none;
color:#000;
background:#fff;
text-align:center;
width:26px;
height:26px;
line-height:24px;
border:1px solid #444;
margin:2px;
}
.gallery li a img {
position:absolute;
top:-320px;
left:0;
visibility:hidden;
border:0;
padding:0;
}
.gallery li a img.landscape {
top:-280px;
}
.gallery li a img.portrait {
left:0;
border-left:40px solid #eee;
border-right:40px solid #eee;
}
.gallery li a:hover {
background:#ddd;
}
.gallery li a:active img, .gallery li a:focus img {
visibility:visible;
}
.gallery li a:active, .gallery li a:focus {
background:#444;
color:#fff;
}
*/ End photo album */
Second, find the a:link definition in your CSS, and add definitions for a:visited, a:hover and a:active. you can format these anyway you like, but they must be in your template for the photo-album to work correctly (because of a bug in IE).
Third, at the spot where you want the album to appear, add the following html:
<div id="album">
<ul class="gallery">
<li><a href="#nogo">01<img class="landscape" src="image1.jpg" alt="image 1" title="image 1" />&;t;/a></li>
<li><a href="#nogo">02<img class="portrait" src="image2.jpg" alt="image 2" title="image 2" />&;t;/a></li>
<li><a href="#nogo">03<img class="portrait" src="image3.jpg" alt="image 3" title="image 3" />&;t;/a></li>
<li><a href="#nogo">04<img class="landscape" src="image4.jpg" alt="image 4" title="image 4" />&;t;/a></li>
<li><a href="#nogo">05<img class="portrait" src="image5.jpg" alt="image 5" title="image 5" />&;t;/a></li>
<li><a href="#nogo">06<img class="portrait" src="image6.jpg" alt="image 6" title="image 6" />&;t;/a></li>
<li><a href="#nogo">07<img class="landscape" src="image7.jpg" alt="image 7" title="image 7" />&;t;/a></li>
<li><a href="#nogo">08<img class="landscape" src="image8.jpg" alt="image 8" title="image 8" />&;t;/a></li>
<li><a href="#nogo">09<img class="portrait" src="image9.jpg" alt="image 9" title="image 9" />&;t;/a></li>
<li><a href="#nogo">10<img class="landscape" src="image10.jpg" alt="image 10" title="image 10" />&;t;/a></li>
</ul>
</div>
Each img src has to point to a picture. The class of this picture can be portrait or landscape.
Attention: if you add this to your Blog using the Blogger editor (as I did), Blogger adds <br/>-tags where it sees new lines. These <br/>-tags mess up the album when displayed with Firefox.
First, you have to add the following CSS to your style-sheet.
/* Photo album */
#album {
width:320px;
height:360px;
background:#eee url(deer.jpg) 0 40px no-repeat;
border:1px solid #aaa;
margin:0 auto;
text-align:center;
}
.gallery {
position: relative;
margin: 320px 0 0 0;
width: 320px;
padding: 0;
list-style-type: none;
}
.gallery img {
border: 0;
}
.gallery li {
float: left;
}
.gallery li a, .gallery li a:visited {
font-size:11px;
float:left;
text-decoration:none;
color:#000;
background:#fff;
text-align:center;
width:26px;
height:26px;
line-height:24px;
border:1px solid #444;
margin:2px;
}
.gallery li a img {
position:absolute;
top:-320px;
left:0;
visibility:hidden;
border:0;
padding:0;
}
.gallery li a img.landscape {
top:-280px;
}
.gallery li a img.portrait {
left:0;
border-left:40px solid #eee;
border-right:40px solid #eee;
}
.gallery li a:hover {
background:#ddd;
}
.gallery li a:active img, .gallery li a:focus img {
visibility:visible;
}
.gallery li a:active, .gallery li a:focus {
background:#444;
color:#fff;
}
*/ End photo album */
Second, find the a:link definition in your CSS, and add definitions for a:visited, a:hover and a:active. you can format these anyway you like, but they must be in your template for the photo-album to work correctly (because of a bug in IE).
Third, at the spot where you want the album to appear, add the following html:
<div id="album">
<ul class="gallery">
<li><a href="#nogo">01<img class="landscape" src="image1.jpg" alt="image 1" title="image 1" />&;t;/a></li>
<li><a href="#nogo">02<img class="portrait" src="image2.jpg" alt="image 2" title="image 2" />&;t;/a></li>
<li><a href="#nogo">03<img class="portrait" src="image3.jpg" alt="image 3" title="image 3" />&;t;/a></li>
<li><a href="#nogo">04<img class="landscape" src="image4.jpg" alt="image 4" title="image 4" />&;t;/a></li>
<li><a href="#nogo">05<img class="portrait" src="image5.jpg" alt="image 5" title="image 5" />&;t;/a></li>
<li><a href="#nogo">06<img class="portrait" src="image6.jpg" alt="image 6" title="image 6" />&;t;/a></li>
<li><a href="#nogo">07<img class="landscape" src="image7.jpg" alt="image 7" title="image 7" />&;t;/a></li>
<li><a href="#nogo">08<img class="landscape" src="image8.jpg" alt="image 8" title="image 8" />&;t;/a></li>
<li><a href="#nogo">09<img class="portrait" src="image9.jpg" alt="image 9" title="image 9" />&;t;/a></li>
<li><a href="#nogo">10<img class="landscape" src="image10.jpg" alt="image 10" title="image 10" />&;t;/a></li>
</ul>
</div>
Each img src has to point to a picture. The class of this picture can be portrait or landscape.
Saturday, October 21, 2006
Using a Lightbox
I got a request for developing a Lightbox plug-in for Blogger Beta. Well, here it is!
A Lightbox is a sort of pop-up box, displaying an image over the webpage. It is not a new browser window, but a box that floats over your current browser window.
If you want to see an example, please click on the image below.

If you want to have this Lightbox on your Blog, follow the instructions:
Step 1: Backup your template.
Step 2: Download the following files:
LightBox Javascript code.
Loading-image.
Close-image.
Step 3: Add the following line of code to your template, inside the <head>-section:
<script type='text/javascript' src='yourhost/lightbox.js'/>
Replace "yourhost" with the domainname of the place where you host your scripts and images. Save your template.
Step 4: Upload files
Upload the image files to your webhost. Open the javascript-file in Notepad, and edit the url's of the image-files, so that they link to your host. Save the javascript-file, and upload it too.
Step 5: Adding CSS
Add CSS to style your lightbox.
#lightbox{
background-color:#eee;
padding: 10px;
border-bottom: 2px solid #666;
border-right: 2px solid #666;
}
#lightboxDetails{
font-size: 0.8em;
padding-top: 0.4em;
}
#lightboxCaption{ float: left; }
#keyboardMsg{ float: right; }
#lightbox img{ border: none; }
#overlay img{ border: none; }
Step 6: Editing your post
Create a post and upload an image. Enter your text, and just make it a nice post.
Then, inside the <a href="..." > tags, add rel="lightbox" and title="Your title" and publish your post. If you click on the image, the large version of your image will pop out of the screen.
Check out this link for more info on lightboxes.
A Lightbox is a sort of pop-up box, displaying an image over the webpage. It is not a new browser window, but a box that floats over your current browser window.
If you want to see an example, please click on the image below.

If you want to have this Lightbox on your Blog, follow the instructions:
Step 1: Backup your template.
Step 2: Download the following files:
LightBox Javascript code.
Loading-image.

Close-image.

Step 3: Add the following line of code to your template, inside the <head>-section:
<script type='text/javascript' src='yourhost/lightbox.js'/>
Replace "yourhost" with the domainname of the place where you host your scripts and images. Save your template.
Step 4: Upload files
Upload the image files to your webhost. Open the javascript-file in Notepad, and edit the url's of the image-files, so that they link to your host. Save the javascript-file, and upload it too.
Step 5: Adding CSS
Add CSS to style your lightbox.
#lightbox{
background-color:#eee;
padding: 10px;
border-bottom: 2px solid #666;
border-right: 2px solid #666;
}
#lightboxDetails{
font-size: 0.8em;
padding-top: 0.4em;
}
#lightboxCaption{ float: left; }
#keyboardMsg{ float: right; }
#lightbox img{ border: none; }
#overlay img{ border: none; }
Step 6: Editing your post
Create a post and upload an image. Enter your text, and just make it a nice post.
Then, inside the <a href="..." > tags, add rel="lightbox" and title="Your title" and publish your post. If you click on the image, the large version of your image will pop out of the screen.
Check out this link for more info on lightboxes.
Thursday, September 28, 2006
Social Bookmarking Revisited
Take a look at the bottom of this post. Hover your mouse over the Social Bookmarks displayed there. Do you like this hack? I thought so.
I saw this use of dynamic HTML at one of my favorite websites, Vladstudio. And reverse-engineered it to fit into Blogger Beta.
For starters, I just give you some simple instructions on how to implement this hack. Later on I'll expand on how this hack works and how to tailor it to your needs. If you want to have other services, let me know.
Implementation is easy.
Step 0: Backup your template.
Step 1: Add the following code to the head of your template:
<script src='http://home.planet.nl/~hansoosting/downloads/beautifulbeta.js' type='text/javascript'/>
Step 2: Find the following line of code in your template:
<p class='post-footer-line post-footer-line-3'/>
and replace it with the code from this file (right-click and save).
Save your template and there you go!
And now for some tech stuff.
At the bottom of the post I have added a 1-row, 2-column table. The left cell contains the text, the right cell displays the icons. The text is between divs with a unique id. The id consists of the string "sbtxt" followed by the post id (data:post.id). Each icon is a link to the specified social bookmark services, and can trigger a onmouseover-event and a onmousout-event. The onmouseover event trigger a call to a javascript showsbtext-function, passing the unique id of the left text-cell, and passing a number from 1 to N, N being the total number of icons. The javascript functions looks for the specified div, and replaces its inner text with another text, such as Add to Digg. The onmouseout-event again invokes this javascript, but now by passing a value of 0 it lets the function display the standard-text.
How to tailor it to your own needs.
You can replace the icons with icons of your own choice. You have to change the links between the <img/>-tags to accomodate for that. You could also change the text that is displayed, by downloading the js-file, and changing the string-array to the values you like.
But I am sure that with this way-points layed out for you, most of you will be able to work it out.
If you need help, please let me know!
I saw this use of dynamic HTML at one of my favorite websites, Vladstudio. And reverse-engineered it to fit into Blogger Beta.
For starters, I just give you some simple instructions on how to implement this hack. Later on I'll expand on how this hack works and how to tailor it to your needs. If you want to have other services, let me know.
Implementation is easy.
Step 0: Backup your template.
Step 1: Add the following code to the head of your template:
<script src='http://home.planet.nl/~hansoosting/downloads/beautifulbeta.js' type='text/javascript'/>
Step 2: Find the following line of code in your template:
<p class='post-footer-line post-footer-line-3'/>
and replace it with the code from this file (right-click and save).
Save your template and there you go!
And now for some tech stuff.
At the bottom of the post I have added a 1-row, 2-column table. The left cell contains the text, the right cell displays the icons. The text is between divs with a unique id. The id consists of the string "sbtxt" followed by the post id (data:post.id). Each icon is a link to the specified social bookmark services, and can trigger a onmouseover-event and a onmousout-event. The onmouseover event trigger a call to a javascript showsbtext-function, passing the unique id of the left text-cell, and passing a number from 1 to N, N being the total number of icons. The javascript functions looks for the specified div, and replaces its inner text with another text, such as Add to Digg. The onmouseout-event again invokes this javascript, but now by passing a value of 0 it lets the function display the standard-text.
How to tailor it to your own needs.
You can replace the icons with icons of your own choice. You have to change the links between the <img/>-tags to accomodate for that. You could also change the text that is displayed, by downloading the js-file, and changing the string-array to the values you like.
But I am sure that with this way-points layed out for you, most of you will be able to work it out.
If you need help, please let me know!
Enhanced Blog Interactivity Using Polls
Completely new to me, and extremely easy to implement are free polls from Pollhost. You can have a poll up and running on your blog withing a few minutes. Just open an account, create your first poll, generate the HTML, and paste it into a Blogger Beta html-page element.
You can have up to 15 polls running, and each poll can have up to 20 answers.
So, let me know which hack is most usefull to you. And if you like other polls, please let me know!
You can have up to 15 polls running, and each poll can have up to 20 answers.
So, let me know which hack is most usefull to you. And if you like other polls, please let me know!
Subscribe to:
Posts (Atom)